Help Topics

Return to Help Menu

The Woodcraft Folk Heritage website is an online archive of documents, images, video and audio recordings relating to the history of the Woodcraft Folk. The complete archive can be publicly searched, browsed and viewed. Various forms of interaction with archive content are available such as sharing on social media, adding personal memories to archive items, and collating items into users’ own Archive Trails. These are described in more detail in this guide.

1. How to Use this Website

Navigation

The navigation bar along the top of the screen provides access to the main features of the site. This is arranged in three sections:

  • The site name, clicking on this will bring you back to the front page
  • The navigation buttons, these take you to different parts of the site as described below
  • The search bar, this allows you to quickly search for content on the site

On larger computer screens the navigation bar is expanded when you first come to a page and then contracts as you scroll down. On smaller, mobile screens, the navigation bar contracts to show just the search bar and a MENU button. Clicking on the MENU button will show you a list of the navigation buttons.

Navigation Buttons

There are six navigation buttons that are shown to all users. These are, from left to right:

  1. Chosen For You: A page of selected material from the archives, articles by Woodcraft groups explaining their use of the archive in projects, and the session plans from the original Woodcraft Folk Heritage website.
  2. About: An introduction to the archive and the website.
  3. Help: Help with using the website.
  4. Contact: An online form to contact the Woodcraft Folk Heritage website administrators.
  5. Trails: A selection of trails through the archive created by Woodcraft Folk members. These are explained in more detail later in this guide.
  6. Login: Login or register for an account on the Woodcraft Folk Heritage website.

If you are a registered member of the site and are logged in you will see seven buttons in the navigation bar. These are, from left to right:

  1. Chosen For You: A page of selected material from the archives, articles by Woodcraft groups explaining their use of the archive in projects, and the session plans from the original Woodcraft Folk Heritage website.
  2. About: An introduction to the archive and the website.
  3. Help: Help with using the website.
  4. Contact: An online form to contact the Woodcraft Folk Heritage website administrators.
  5. Trails: Your own trails and a selection of trails through the archive created by Woodcraft Folk members. These are explained in more detail later in this guide.
  6. Profile Page: Your personal profile page and dashboard, explained in more detail later in this guide.
  7. Logout: Log out from your account.

Front Page

The front page of the website presents a short documentary film about the Woodcraft Folk with actress Michelle Collins who was herself part of the Woodcraft Folk. The film features short extracts from different films that are part of the archive itself.

Below this are buttons for our LUCKY POT, which will take you to a random item in the archive and is a great way of finding new and surprising things, and to GET INVOLVED and find out how to help with the archive site.

Below this are a selection of more random picks from the archive to give you an idea of what the site contains and encourage you to dive in and explore.

2. Logging In and Creating an Account on the Site

There are two main types of registered user on the site: members and administrators. Members are able to add archive memories, create archive trails, edit transcripts and contact other members on the site. Administrators can do everything that members can do and in addition can add and edit archive documents, manage transcripts, select featured content, edit site information pages and manage other users.

Logging In

Click on the LOGIN button in the navigation bar. You can either login with your own Woodcraft Folk Heritage website account or with an existing Twitter or Facebook account.

If you have Woodcraft Folk Heritage website account, enter your username and password and click the LOG IN button.

If you want to use your own Twitter or Facebook account, click on the appropriate badge for your account. If you are doing this for the first time you will be automatically asked if you wish to join the Woodcraft Folk Heritage website and, if you agree, an account with the website will be created and linked to your Twitter or Facebook account.

Creating an Account

If you do not have or prefer not to use a Twitter or Facebook account you can create your own user account on the Woodcraft Folk Heritage website. Click the SIGN UP AS A MEMBER button and fill out the registration form.

After registering, whether by social media or a new account, you will receive an email from the site asking you to confirm your email address. If the email does not arrive please check that it has not gone into your junk folder. Click the link in the email to confirm. This will open the site in your browser. Click the CONFIRM EMAIL button. You will now be able to login to the website.

Note: Each user must have a unique email address and the same email cannot be used by different user accounts. If someone wanted to have separate staff and member accounts, for example, they would therefore have to create different accounts with different email addresses.

3. Searching the Site

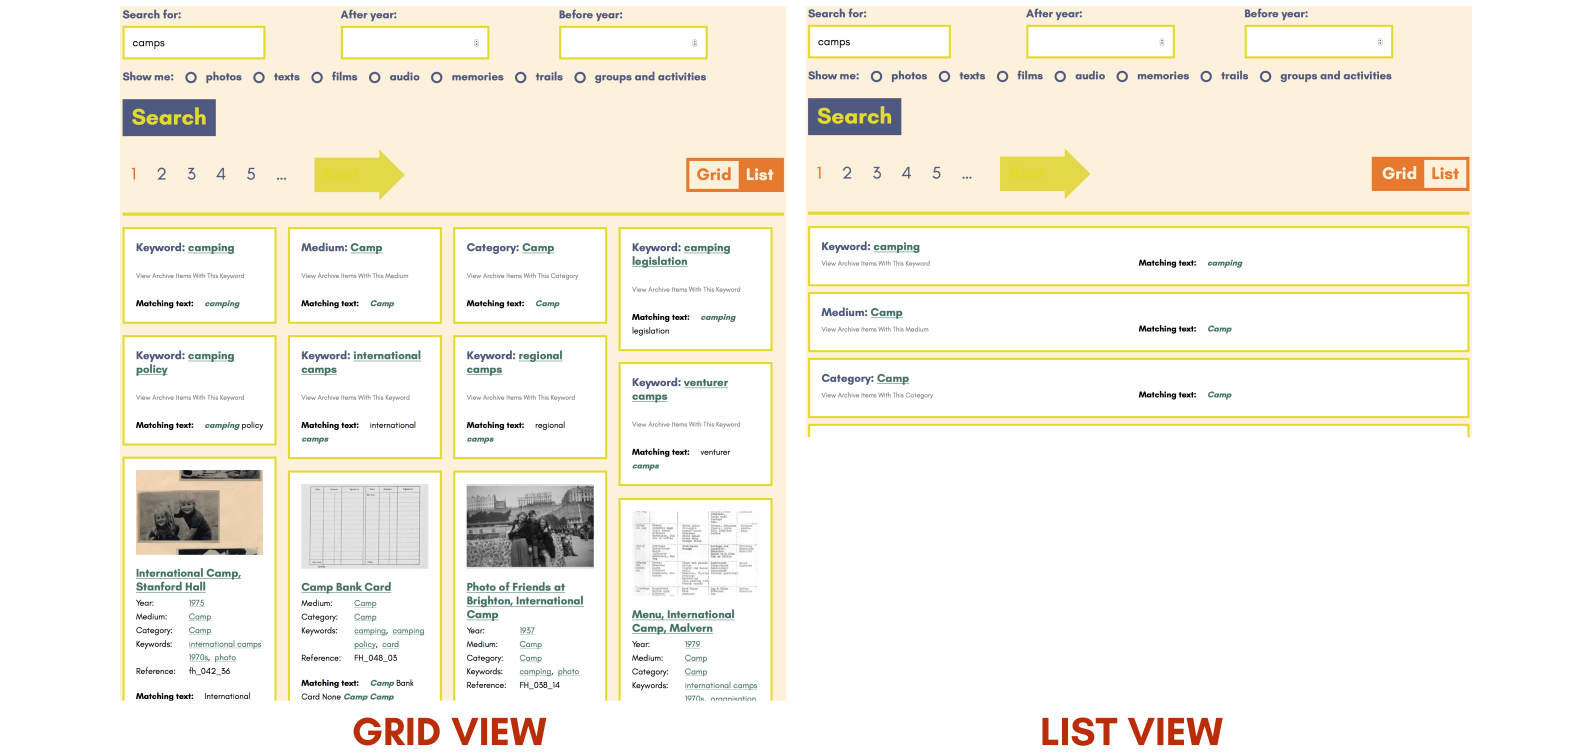
The search bar is always available wherever you are on the site. Just type in a word or phrase and click on the SEARCH button. The results are shown on the search page which has some more advanced options to refine your search. If you want to go straight to the advanced search at any time just click on the SEARCH button in the navigation bar.

With the advanced search you can request results from a specific time period by entering years to search within or by selecting from one or more of the filters. The search filters are:

  • Texts: Find archive items such as written documents and publications.
  • Films: Find films in the archive.
  • Audio: Find sound recordings in the archive.
  • Memories: Find personal memories adding by site members.
  • Trails: Find trails created by site members.
  • Groups and Activities: Find Woodcraft Folk groups, project and camps.

The results from a search are displayed below the advanced search options. These can be viewed either in a grid layout or list layout that you can switch between by clicking on the GRID/LIST button.

If there are a lot of results, these will be organised into a series of pages that you can click through either with the PREVIOUS and NEXT buttons or by clicking on specific page numbers.

4. Sharing Things

Content, such as archive items, trails and articles, on the site can be shared to Facebook, Twitter, Tumblr and Pinterest. These are represented by a set of badges near the top of a sharable page. Click on the badge for the platform you wish to share to. This will link you to that platform. You may be asked to login to the platform and format how to share the item. You do not have to be registered with the site to use these but you will need an account with the social media platform you choose to share to.

5. Contacting the Site

Click on the CONTACT button in the navigation bar. This will take you to the contact page where you can find information for contacting Woodcraft Folk or send a query using the online form. Please provide your name and an email address in the appropriate fields of the form. If you do not have an email account then please provide a phone number or postal address in your message. Click the SEND button. Your message will be emailed to a member of the Woodcraft Folk Heritage staff and, if you have supplied an email address of your own, a copy will be sent to you.

6. Contacting Other Users

If a user has chosen to make their profile public and allowed other users to contact them through the site a contact box will be available on their public profile page where you can send a message to them. This will be sent to their email address. Only logged-in users can send messages. The email address for the person you are contacting will remain anonymous. Your display name will be automatically included to identify you to the recipient.

If you receive abusive or inappropriate messages through this service please contact the website administrators to let them know.

7. Archive Items

The archive is the main content of the site and is a growing collection of documents, photos and media that trace the history of the Woodcraft Folk.

Viewing an Archive Item

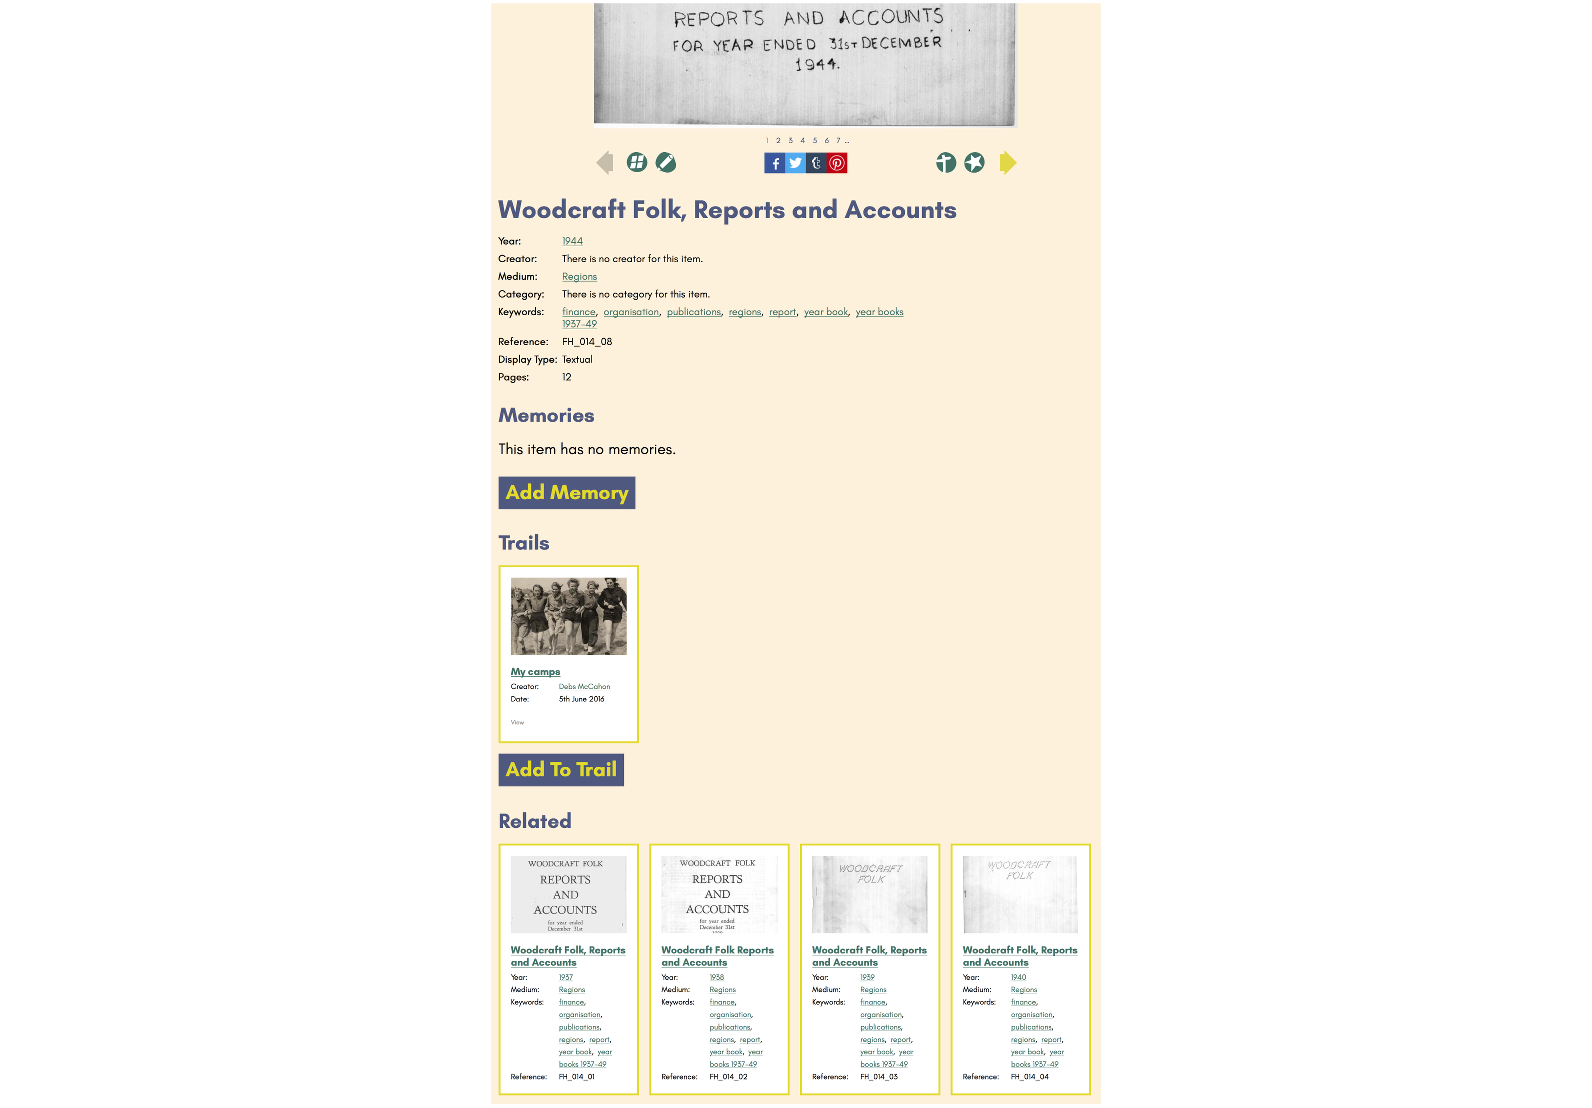
Each archive item has its own webpage on the site. The item is displayed at the top of each webpage in the display area. Many of the items contain multiple elements, such as a collection of photographs. For documents and publications each page or page-spread can be viewed individually.

Below the display area there is a listing of the information recorded for that item. This includes information such as the date and creator of the item and keywords and categories that relate one item to another. By clicking on the entries in the information area you can find other archive items that share those features, for example to see a listing of other items from the same year or created by the same person or belonging to the same category. This way you can quickly browse through related material on the archive.

Below the information area are a listing of personal memories relating to that item that have been left by Woodcraft Folk members and a listing of any archive trails created by site members that this item has been added to. At the bottom of the webpage there is a selection of other related items.

Using the Display Area

There are a few tools in the display area that allow you to view and interact with the content.

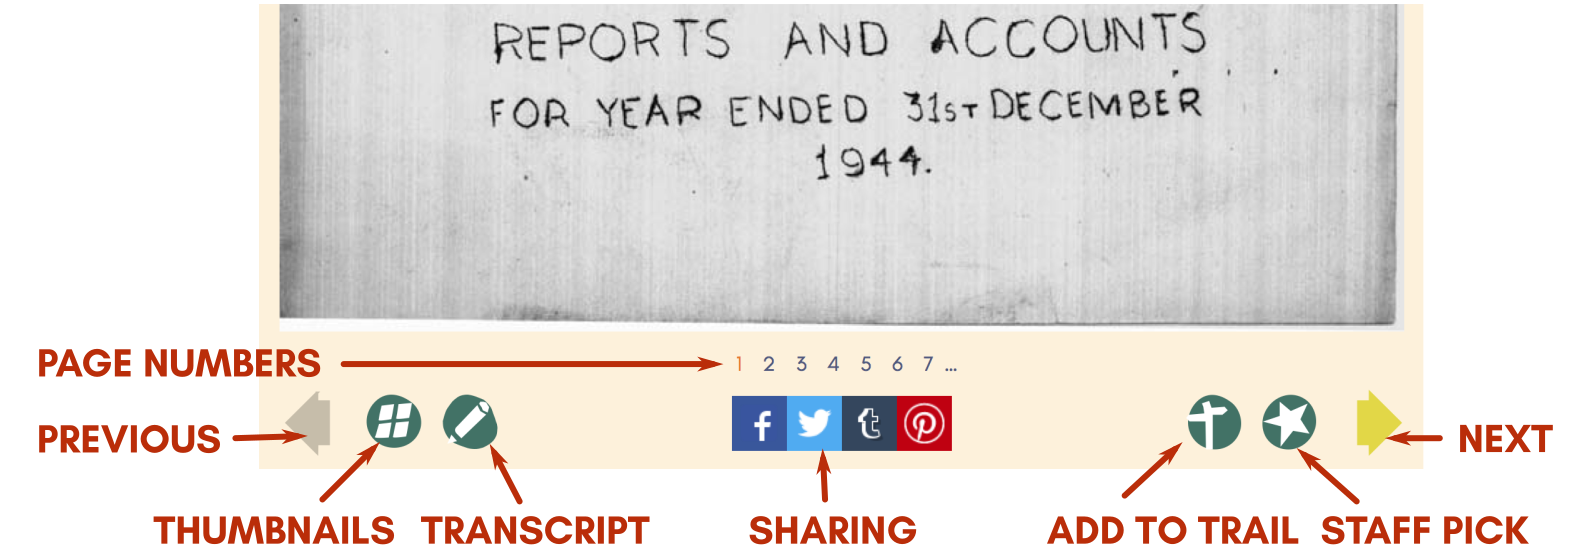
If an item has only one content element, such as a film clip or a single image, then this will be displayed on its own. If the item has multiple content elements, such as the pages of a book publication, the first element will be shown, such as the book cover. Below this there are PREVIOUS and NEXT arrows and a set of page numbers that you can click on to move through the elements in order.

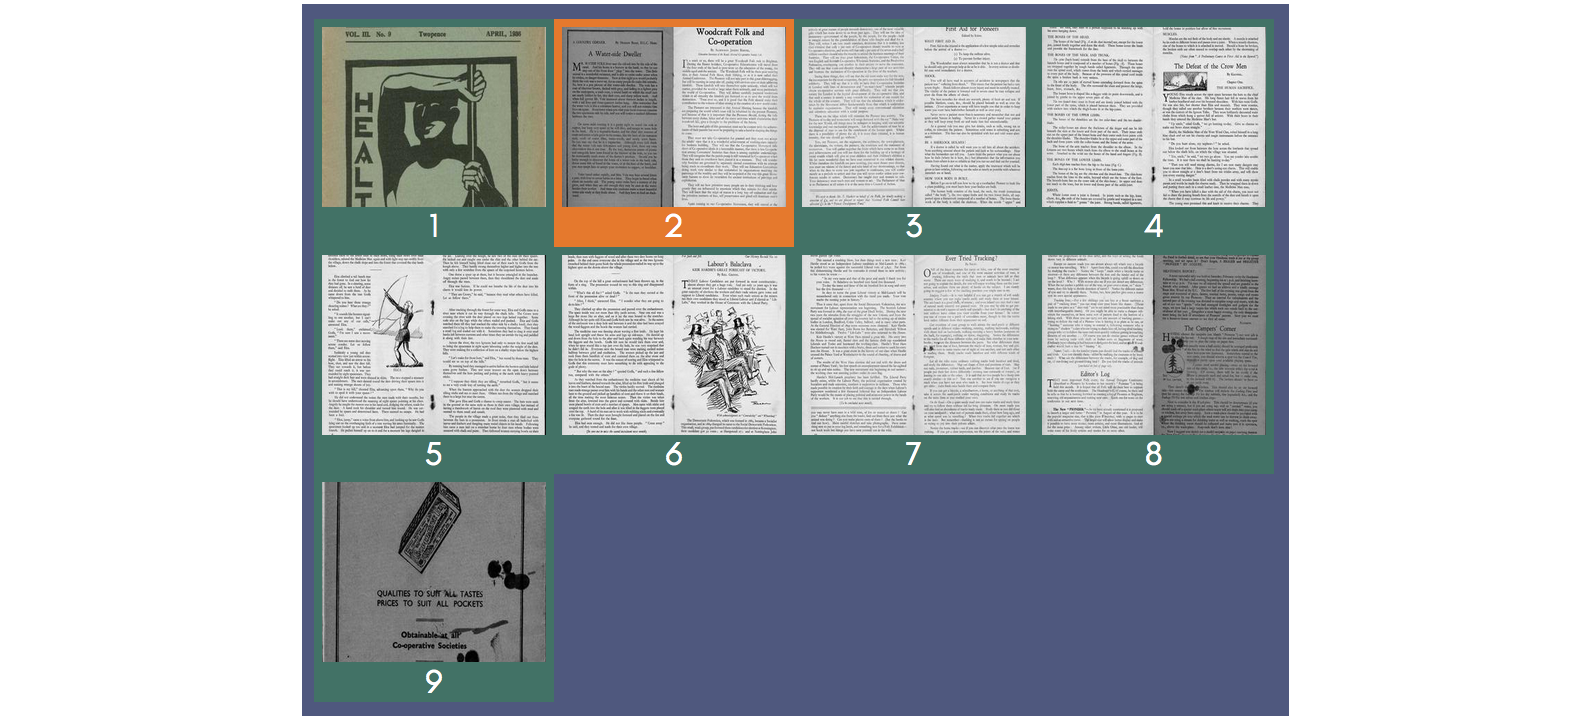
You can also click on the THUMBNAIL button (a small green blob with four squares on it) to see a set of thumbnail images of every content element for that item. The element currently displayed will be highlighted in orange. Click on any thumbnail to see that element displayed in full. Each thumbnail can also be selected by using the TAB key to move forwards and SHIFT+TAB keys to move back. To view the selected element press ENTER. To close the thumbnail view click on the purple background or the CLOSE button in the top-right corner of the screen.

If the item is a written document and has been transcribed you can view the transcription of the content by clicking on the TRANSCRIPTION button on the left-hand side of the display area.

Items can be shared to platforms such as Facebook, Twitter, Tumblr and Pinterest, by clicking on one of the social media badges below the display image.

You can also add an item to one of your own archive trails by clicking on the ADD TO TRAIL button on the right-hand side of the display area.

If you are a staff user you will also see a STAFF PICK button on the right-hand side of the display area. Clicking on this will add an item to the suggestions for the Chosen For You page.

Adding Memories to an Archive Item

Archive Memories allow users to add personal memories and notes to items in the archive. Any item in the archive can have memories attached to it and multiple memories can be attached to each item. Users must be logged-in to add a memory.

A memory can be added to an archive item. Click on the ADD MEMORY button when viewing that item's webpage. A text box will appear in which you can type in your memory. All memories are publicly viewable.

Memories are displayed as part of the listing for each archive item.

Memories can be edited or deleted by the user who created them. When a user is viewing an archive item with a memory they added, an EDIT button will appear next to that memory. You can click on this to edit or delete the memory. Users can also access the memory to edit or delete from their user dashboard.

Staff users can edit and remove memories created by any other user. Members can only edit and remove their own memories.

8. Archive Trails

An Archive Trail is a selection of items from the archive that has been put together by a user. Archive Trails can be used as a way of collecting and organising a user’s favourite items in the archive or as a way of creating educational resources from archive content. Archive Trails can be public or private. Public Archive Trails can be searched and viewed on the site as archive items in their own right and as such can also be shared to social media. Private Archive Trails are only available to the person who created them and cannot be shared.

An Archive Trail can be viewed as an article or as a slideshow and converted into a PDF document to be printed out as a personal brochure or an educational hand-out.

Creating and Editing an Archive Trail

You can edit an Archive Trail either by clicking on the TRAILS button in the activity bar and selecting it to edit from the list that appears or by selecting the Trail from the list on your dashboard page.

When editing a Trail you can change its name, change it to public or private, change the order of items in the trail, remove items, add notes to the items, edit what content is displayed in a slideshow or PDF.

Changing an Archive Trail Name

Click on the name of the Trail and type in the new name. Press enter or click the OK button to save the new name.

Setting an Archive Trail to Public or Private

A toggle button labelled either PUBLIC or PRIVATE will be displayed next to the name. Click on the button to change from public to private or private to public.

Changing the Order of Items in an Archive Trail

Items appear in the order they were originally added to a Trail.  These are displayed as a list of boxes that can be dragged and dropped to change the order.

Keyboard control: Press the tab key to move from one item in the Trail to the next. The item will change colour to show that it is in focus. Press the space bar to select the item. Press the up arrow key to move the item up the list and the down arrow key to move it down.

Removing Items from an Archive Trail

Click on the REMOVE button in the item box. Click OK or CANCEL when asked to confirm this.

Keyboard control: Press the tab key to move from one item in the Trail to the next. The item will change colour to show that it is in focus. Press the space bar to select the item. Press the DELETE key to remove it. Use the tab key and space bar to select OK or CANCEL when asked to confirm this.

Adding Notes to Items in an Archive Trail

The box for each item in a Trail displays a box where you can add or edit notes that can be displayed with the item in a slideshow or PDF. Click in the box to add or edit a note. Press enter or click the OK button to save the note.

Keyboard control: Press the tab key to move from one item in the Trail to the next. The item will change colour to show that it is in focus. Press the space bar to select the item. Press option + space bar again to activate the note box. Type in your note. Press option + space bar again to deactivate note box.

Setting the Display Mode for the Archive Trail

An Archive Trail can be viewed on the site in article, slideshow or game format. You can choose which of these is the default option by clicking on one of the options in the DISPLAY button group:  ARTICLE or SLIDESHOW.

Adding Items to an Archive Trail

When viewing an archive item you can click on the ARCHIVE TRAIL button in the display area. This will add the item to your current Archive Trail.  If you do not have an active Trail you will see a message telling you this. You can change the currently active Trail, or select to create a new one, by clicking on the TRAILS button in the navigation bar. This will display a list of Trails that you have created. You can select a Trail from this list to make it the currently active Trail, to view it or to edit it.

Only logged-in users can create Archive Trails.

Publishing an Archive Trail

You can publish a Trail that you have created as a PDF from the edit page. There are two formats to choose from:

  1. Article: This formats the Trail as a continuous essay similar to the article option for viewing on the site but in the form of an A4 document. The article runs over however many pages it requires with page numbering provided and the Archive Trail name, creation date and your display name in the document title heading. Click the DOWNLOAD ARTICLE button.
  2. Book: This formats the Trail into an A4 document with each item given its own page (or several pages if required). It has a cover page with the Archive Trail name, creation date and your display name. When creating the booklet you have the option to include, along with the image, title, date and your notes, the full archival information and any attached memories for each item. Click the DOWNLOAD BOOK button.

9. Articles

Articles enable Woodcraft Folk members to write about their experiences of using materials from the archive. Public articles are available on the Chosen For You page, where they most recent articles are presented along with a link to a full listing of public articles. Articles by a specific member can also be accessed from that member's profile page if it has been made public.

Becoming an Article Author

Members can be given permission to become article authors by contacting the website administrators using the contact form. Once a member has been made a author the MANAGE MY ARTICLES button will appear on their dashboard page. This opens a page showing a listing of articles they have written. A panel listing their articles will also be displayed in the profile page. This will show the most recent articles you have worked on. Other members can only see your public articles but you will be able to see both public and private articles.

Creating and Editing an Article

To Create a new article click the CREATE ARTICLE button in the articles panel on your prolife page or on the Manage My Articles page. This will open the article editor page. Each article must have a title. The edit panel for the article content provides a set of standard text formatting tools similar to that of a word processing tool.

To edit an existing article, open the article page and you will see an EDIT THIS ARTICLE button at the bottom of the screen below the article content. Click on this to open the article in the editor page. Alternatively you can find the article in your Manage My Articles page and click the EDIT button.

If you are working on a draft version of the article and do not want it to be seen by others select the PRIVATE option.

Once you have written or edited the article click the SAVE ARTICLE or SAVE CHANGES button.

Adding Images to an Article

You can add images to an article from elsewhere on the Internet, such as the Woodcraft Folk Heritage site, or upload your own.

Click the IMAGE button in the editor. A new panel will open.

To link to image on the Heritage site or from elsewhere on the Internet, find the image, right-click on the image and choose the 'Copy Image Location' or 'Copy Image Address' option. Click on the LINK tab on the Image panel and paste the image location into the URL field.

To upload an image, click on the UPLOAD tab in the Image panel. Click on the BROWSE button. A file finder window will open, find you image and select it's name and click OPEN or OK. Now click the SEND IT TO SERVER button. Once your image is uploaded it will be displayed in the IMAGE INFO panel, click OK to add it to the article.

You can adjust the size of your image in the edit panel by clicking on it and then dragging one of the square handles that will appear around the image. For the best results however we recommend that you do not resize images on the page as this often results in images that do not display well on mobile and tablet screens.

For best results, resize your image to the largest size you want it before adding to your article. Add the image as described above but when the image appears in the IMAGE INFO panel, delete the width and height values so that these boxes are empty, and then click OK. This way your image will be automatically scaled to the best size when viewed on different sized screens.

10. Transcriptions

Many of the items in the archive are scanned pages from documents and publications. Unfortunately, as these are images, the content of these documents is not available to search engines. We are therefore looking to transcribe as many of these documents as possible on the website.

Transcriptions can be created entirely by hand or with the help of OCR (Optical Character Recognition) software using one of the existing desktop or online tools. All transcriptions should be added to the site manually.

Becoming a Transcriber

All administrative users are able to edit transcripts. Member users can be given permission to become transcribers by contacting the website administrators using the contact form. Once a member has been made a transcriber the MANAGE MY TRANSCRIPTS button will appear on their dashboard page. This opens a page showing a listing of transcripts they have worked on.

Transcribing an Archive Item

You can access a transcription for editing in two ways. Firstly, when a user with transcription editor permissions views an item in the archive, if that item has a transcription available for edit, an EDIT TRANSCRIPT button will appear next to the area displaying the transcript text. Clicking on this button will change the transcript display to editor mode. Secondly, the transcript widget on the user dashboard will show a list of transcripts the user has worked on and a selection of items awaiting transcription. Clicking on one of these will open the item with the transcript display in editor mode.

The editor display provides a textbox into which the transcript can be typed. This will provide tools for very basic text formatting: headings, bold and italic texts. These are restricted as it is intended that a transcript should only represent the content and not the complete formatting of the source document.

11. Personal Profile and Dashboard

Everyone registered on the site has a profile page. You can use this to provide information about yourself such as your own history within the Woodcraft Folk or the groups, projects and camps that you have been involved in. All profile pages are public but you can set your profile to be private if you wish.

When you log in yourself, your profile page will also contain tools that only you can use. These include setting your email address and a set of services in the dashboard area.

Editing Your Profile

Your profile provides basic information about you that you can choose to make available to other users on the site. You can choose to make your profile public so that others can search for you as part of the archive. You can also choose if you wish other members to be able to contact you through the site.

Your display name will be used wherever content you have added to the site, such as archive memories or trails, is displayed. If you do not provide a display name your username will be used instead.

Your description or biography is a short text about yourself that will be shown to other people who can view your profile.

Adding Yourself to Woodcraft Groups, Projects and Camps

You can add a list of Woodcraft Folk groups, camps and project you have been a member of. To add a group, click on the JOIN GROUP button select from the list of groups provided and enter the years for when you joined and left the group. If you make your profile public your name will appear in the list of members for each group in the archive. If the group you were a member of is not listed, click on the ADD NEW GROUP button, enter the name of the group, the dates it was setup and, if appropriate, closed down and select its location from he drop-down menus. Click SAVE GROUP to add this to the list.

You can add yourself to camps and projects, or create new ones, in a similar fashion.

Members Dashboard

The dashboard will provide a list of all the Archive Memories you have added, Archive Trails that you have created and, if appropriate, Transcripts and Articles you have worked on. You can access each of these from the listing to edit, change between public or private viewing, or delete from the site. If you have permission to edit transcripts or author articles you will also see a list of all the transcripts and articles you have worked on which you can access from here to edit.

Manage My Archive Memories

This provides a listing of all the memories you have added to different items in the archive with a short extract of text from each one. You can choose to READ or EDIT an item.

Manage My Archive Trails

This provides a listing of all your public and private Archive Trails. To edit a trail select it from here and then scroll to the bottom of the screen and click the EDIT THIS TRAIL button.

A listing of your trails is also found on the Trails page when you are logged in.

Manage My Transcripts

This provides a listing of all your transcripts from across the archive with a short extract of text from each one. To edit a transcript, click the VIEW button and then click EDIT TRANSCRIPT below the area where the text is displayed.

Please note you must be registered as a transcriber to have this panel. If you wish to become a transcriber contact the site administrators through the Contact page.

Manage My Articles

This provides a listing of all the articles with a short extract of text from each one. You can choose to READ or EDIT an item.

Please note you must be registered as an author to have this panel. If you wish to become an author contact the site administrators through the Contact page.

Administrator Dashboard

In addition to all the tools provided in the members dashboard, the administrator dashboard also provides tools to manage the archive, transcripts, articles, Woodcraft groups, camps and projects, Chosen For You features and other users. These tasks are described elsewhere in this guide.

12. Privacy and Cookie Policies

Privacy Policy

The Woodcraft Folk Heritage site only stores information provided by users by with their consent. This information is required to use the site (such as login details) and for content that users provide or create themselves (such as information about Woodcraft Groups you were a member of, or Archive Trails you have created). We do not store any additional information.

Information provided by users that might be stored on the site includes:

  • Username
  • First and last names
  • Email address
  • Biographical information provided on the profile page
  • Listings of Woodcraft Folk groups, camps and projects the user has provided on the profile page
  • Archive Memories created by users
  • Archive Trails created by users
  • Archive Experience articles created by users

Some of these items made be made public on the website and therefore seen by other users of the site. Archive Memories are always public. Users can choose whether to make their profile page information, Archive Trails and Archive Experience articles public or private. Please note that the default setting for these is always public.

Some items on the website can be shared via social media. These are items in the archive that may include memories you have added to them, public archive trails and public articles. By making items if these kinds that are public we assume that you give consent for them to be shared on social media.

Please note that once information has been shared to a third party social media platform, Woodcraft Folk cannot accept responsibility for how that information is used, edited or represented on that third party platform.

All other information provided by users of the Woodcraft Folk Heritage site is treated as private and is not made available to third parties.

Cookie Policy

The Woodcraft Folk Heritage website uses cookies to ensure security across the website.

Primarily this is used to enable us to know when you are logged onto the site and to apply additional security to any forms that allow data to be sent to or modified on the site.

No personal data is stored or collected from the cookies that the Woodcraft Folk Heritage website provide.

External cookies from third party social media websites may be used if you visit a page which contains embedded content from social media. Such third party cookies may track your use of this website.